

- 12-17 Min Read
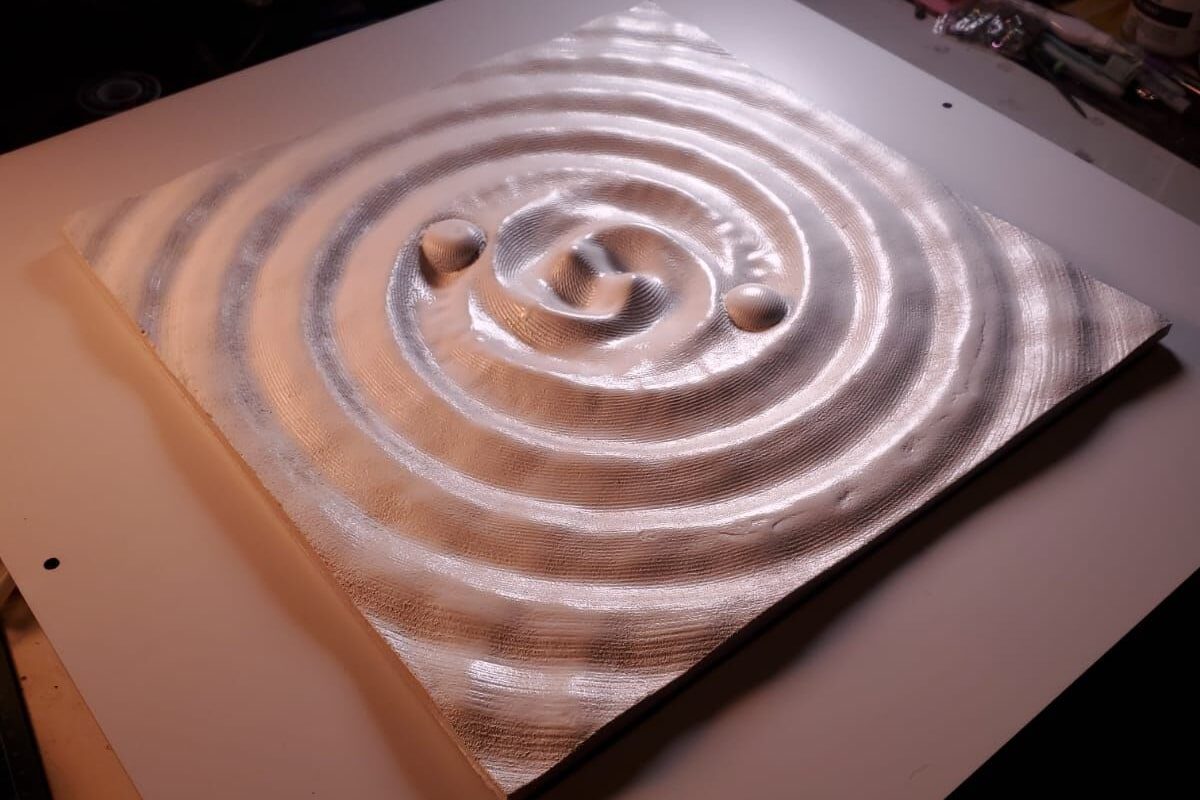
CNC routers have become essential tools for creators seeking precision, efficiency, and versatility in design. Whether you’re working with wood, plastic, or metal, these machines allow you to transform digital designs into highly detailed physical products. One of the most impressive capabilities of a CNC router is its ability to produce intricate patterns. From decorative wall panels and custom furniture accents to complex signage and artistic engravings, intricate patterns add visual interest and craftsmanship to any project.
However, achieving clean, accurate results with complex designs requires more than just loading a file and pressing “Start.” It involves careful planning, the right software tools, smart material selection, and precise machine setup. In this guide, we’ll take you step-by-step through the process of designing and cutting intricate patterns using a CNC router. Whether you’re a hobbyist or a professional fabricator, this article will help you understand the entire workflow, from creating the initial vector design to executing a flawless final cut.
Understanding CNC Router Capabilities
Before diving into the process of designing and cutting intricate patterns, it’s important to understand what a CNC router is capable of. Knowing the full scope can help you plan better projects and get the most out of your machine.
Basic Functions of a CNC Router
At its core, a CNC router is designed to automate and enhance the precision of cutting and shaping materials. Here are its basic functions:
- Cutting: Cutting is the most fundamental function of a CNC router. It involves directing the router bit along a programmed path to slice entirely through the material, separating shapes or outlines from a larger piece.
- Engraving: Engraving allows the CNC router to carve detailed patterns, text, or images into the surface of a material without cutting all the way through.
- Pocketing: Pocketing is the process of removing material within a defined area to create a recessed space or cavity. CNC routers use pocketing to gradually mill out a surface layer by layer, leaving a clean, flat-bottomed area.
- Drilling: Drilling on a CNC router involves boring holes at precise locations and depths, which is often required for assembly, fasteners, or mounting.
- These functions can be used independently or combined in a single project, giving users the flexibility to create everything from simple shapes to highly detailed and layered designs with minimal manual effort.
Why CNC is Ideal for Detailed and Precise Patterns
From high-resolution cuts to consistent multi-part production, CNC technology removes the guesswork from complex pattern-making. With their precision, consistency, and digital flexibility, CNC routers are an ideal solution for creating detailed and complex patterns.
- High Precision and Repeatability: CNC routers follow digital instructions with exceptional precision, enabling them to execute complex shapes and smooth curves without manual error. Once a pattern is designed and programmed, CNC routers can reproduce it endlessly with exact precision, ensuring every copy is identical to the original.
- Advanced Software Capabilities: CAD/CAM software used with CNC routers empowers users to plan and refine every detail of a design before cutting begins. Simulation tools, node editing, and path optimization features help eliminate guesswork and reduce errors, making the process both efficient and predictable.
- Adaptability Across Materials and Projects: Whether working with wood, plastic, acrylic, or metal, CNC routers can be fine-tuned to handle different materials with equal precision. This adaptability makes them suitable for a wide range of applications, from artistic carvings to industrial components.
Examples of Intricate Woodworking Projects
CNC routers are incredibly versatile machines capable of handling complex designs across multiple industries. Here are several examples of intricate projects:
- Decorative Wall Art and Panels: Using detailed vector designs, CNC routers can cut ornate patterns into wood or acrylic to create decorative wall panels or customized home décor with symmetrical and flowing motifs.
- Custom Furniture Details: Projects like inlaid tabletops, carved chair backs, and engraved cabinet doors require precise cutting and engraving. CNC routers make it possible to add sophisticated detail to furniture components while maintaining uniformity across sets.
- 3D Relief Carvings: CNC routers can sculpt three-dimensional shapes into flat materials, producing intricate landscapes, portraits, or ornate textures.
- Personalized Signs and Logos: From stylized text to detailed logos or images, CNC routers make it easy to produce custom signage with depth and character.
Each function of a CNC router plays a specific role in shaping and detailing your material, and learning how to use them effectively opens the door to more complex and creative designs. With a solid grasp of your machine’s potential, you’re better equipped to produce high-quality, detailed work with precision and consistency.
Tools and Software You'll Need
Before you can begin crafting intricate patterns with a CNC router, it’s essential to equip yourself with the right tools and software. From digital design to physical cutting, each step relies on specific tools that work together to bring your ideas to life. Below is a breakdown of the essential tools and software you’ll need to get started.
CNC Router Machine
The CNC router itself is the centerpiece of your workflow. Depending on your project size and material type, you may choose a desktop CNC router for small-scale work or a large-format industrial machine for full-size sheets. Most machines operate on three axes (X, Y, and Z), while more advanced models offer 4-axis or 5-axis movement for greater flexibility and more complex cuts. Features like spindle power, rigidity, and bed size should match the complexity and scale of your designs when choosing a CNC router.
Design Software (CAD)
CAD (Computer-Aided Design) software is used to create or import the visual design of your pattern. Common tools include:
- Adobe Illustrator / CorelDRAW: These vector-based graphic design tools are ideal for creating clean 2D patterns, shapes, and lettering.
- Fusion 360: This is a powerful 3D CAD platform that integrates both design and CAM capabilities. It’s ideal for 3D modeling and mechanical design.
- SolidWorks: This is a professional-grade CAD software known for its precision in mechanical and industrial design. It’s commonly used in manufacturing environments where high-accuracy 3D modeling is required.
- VCarve / Aspire: Specifically made for CNC design, with built-in tools for artistic patterns and relief carving.
CAM Software (Toolpath Generation)
Once your design is complete, the next step is to convert it into instructions your CNC router can understand. This is where CAM (Computer-Aided Manufacturing) software comes in. CAM software takes your CAD design and generates toolpaths, along with details like cut depth, feed rate, and spindle speed. The final output is usually G-code, which controls your CNC machine. The right CAM software helps ensure your project is cut cleanly, efficiently, and safely.
Cutting Tools (Router Bits)
The quality of your cuts depends heavily on the bits you use. For intricate designs, common bit types include:
- V-Bits: These are ideal for engraving fine lines, sharp corners, and decorative lettering. They come in various angles, allowing for different line thicknesses depending on cut depth.
- Ball Nose Bits: These have a rounded tip, making them perfect for 3D carving and smooth contouring.
- Straight End Mills: These are flat-tipped and used for clean cutting straight edges, profiles, and pockets.
- Tapered Ball Nose Bits: These combine the advantages of a narrow tip and a stronger, tapered shaft. They are particularly useful for high-detail 3D carving, especially in hardwoods or dense materials.
- Engraving Bits / Drag Bits: For extremely fine detail work, engraving bits and drag bits offer a non-rotational or shallow-rotational method of scratching the surface to create precise lines and textures.
Materials and Workholding Tools
To achieve clean, accurate results with your CNC router, you need the right materials and ensure they are properly secured during cutting. Different materials, such as plywood, hardwood, MDF, acrylic, and aluminum, each have unique characteristics that affect how they respond to the router. You’ll also need clamps, vacuum tables, or double-sided tape to hold the material securely in place during cutting. Together, the right material and a stable setup form the foundation of a successful CNC project.
Having the appropriate tools and software is beneficial to unlocking the full potential of your CNC router. From digital design to machine control, each component plays a key role in ensuring precision, safety, and quality. With this foundation, you’re ready to explore the next step: designing intricate patterns that your CNC router can bring to life with precision.
Designing Intricate Patterns
Creating intricate patterns with a CNC router begins with thoughtful, precise design. A strong design not only defines the artistic appeal of your project but also determines how smoothly the cutting process will go. Below are best practices to help you design patterns that are both beautiful and CNC-ready.
Concept and Planning
The foundation of any successful CNC project lies in a clear concept and careful planning.
- Define the purpose and function of the pattern: Understanding whether the design is purely decorative, functional, or both will guide your choices throughout the process.
- Choose suitable dimensions and complexity: The size of your design should match the scale of the project and the capabilities of your CNC router. Additionally, the complexity of the pattern needs to balance artistic intent with practical limitations like bit size, material properties, and machining time.
Creating the Design
Once your concept is clear and your plan is in place, the next step is to bring your vision to life by creating a precise and CNC-compatible design.
- Start with Clear, Scalable Vectors: Use vector-based design software like Adobe Illustrator, Inkscape, or VCarve to create scalable artwork that maintains its clarity regardless of size. Avoid overly complex line work or excessive anchor points, as these can create issues during toolpath generation or cause unnecessary strain on the machine.
- Balance Detail with Tool Capability: It’s important to design with your cutting bits in mind. Plan your pattern to match the smallest bit you intend to use, and test intricate portions with a preview toolpath to ensure all features are achievable. Overly tight curves or narrow spaces may need to be simplified or adjusted for practical cutting.
- Use Layers and Colors to Organize Toolpaths: To streamline the transition from design to machining, organize your pattern using layers or colors. This helps distinguish between cut types and makes it easier to assign the correct tools and depths later in your CAM software.
Preparing the File for CNC
After completing your design, the next critical step is preparing the file for CNC machining. This stage involves converting your artwork into precise toolpaths that your CNC router can follow.
- Import Your Design into CAM Software: Start by importing your finalized design into a CAM program. It translates your vector or 3D design into machine instructions (G-code) by generating toolpaths based on the shapes, depths, and materials defined in your design.
- Assign Toolpaths by Cut Type: Use your CAM software to assign appropriate toolpaths to different parts of your design. Common operations include profiling, pocketing, engraving, and drilling. For intricate designs, use finer bits and slower feed rates to ensure detail and accuracy.
- Preview and Simulate Before Cutting: Before exporting your design for CNC machining, always run a simulation in your CAM software to visualize how the tool will interact with the material. This allows you to spot problem areas and make adjustments before committing to the material.
- Export the G-Code: Once satisfied with your setup, export the toolpaths as G-code, the language your CNC router understands. Save the file using the correct post-processor format for your specific CNC machine model. Double-check file names and parameters before sending them to the CNC router.
Designing intricate patterns requires a careful balance between artistic intent and technical feasibility. With the right approach, your CNC router can bring even the most detailed designs to life with precision and consistency.
Material Preparation and Machine Setup
Even the best designs can fail if the material shifts during machining or if the CNC router isn’t correctly configured. Proper material preparation and machine setup ensure that everything is stable, aligned, and optimized before the cutting begins.
- Select and Inspect Your Material: Choose a material that matches your design’s detail level and intended use. For intricate patterns, materials like MDF, plywood, acrylic, and hardwoods are popular due to their stability and consistency. Inspect the surface for warping, cracks, or inconsistencies, as defects can cause errors in precision work. Be sure the material is flat and clean to ensure a secure setup.
- Setting Up Your Machine: Before each project, check that your CNC bed is level relative to the spindle. Use a dial indicator or surfacing tool to verify flatness and correct any deviations by adjusting the spoilboard or machine bed.
- Secure the Material Properly: Use clamps, a vacuum table, double-sided tape, or screws depending on your material type and project needs to keep the material firmly in place during the cut. If using clamps, position them outside the cutting area to avoid collisions. For intricate designs that require full-through cuts, adding tabs to your toolpath and securing the material from underneath can prevent small parts from shifting or breaking loose.
- Install the Correct Cutting Bit: Select a bit suited for detailed work—typically smaller diameter bits like 1/8″, 1/16″, or even 1/32″. Ensure the bit is sharp, clean, and securely tightened in the collet. Set the correct spindle speed and feed rate for both the material and bit size to prevent burning, chipping, or rough edges.
- Set the Running Parameters: For detailed patterns, slower spindle speeds (e.g., 12,000–18,000 RPM) paired with small-diameter bits help reduce burning and maintain precision. In addition, a slower feed rate is ideal for intricate cuts, allowing the bit more time to work through fine details without breaking or chipping the material.
- Set the Zero Point Accurately: Define your machine’s origin point (usually the front-left corner of the material) by setting the X, Y, and Z zero positions. Use a touch plate or manually jog the bit to the correct height. Accurate zeroing ensures the router cuts to the right depth and follows the intended design path.
Before the cutting begins, careful material preparation and machine setup lay the groundwork for a successful CNC project. This stage ensures that your material is flat, secure, and compatible with the design, while your machine is properly leveled, equipped, and configured for precise operation. Taking the time to get this part right helps reduce errors, waste, and rework.
Executing the Cut
With your design finalized, materials prepared, and the CNC machine correctly set up, it’s time to bring your intricate pattern to life. The cutting stage is where all the planning pays off—but it still requires careful monitoring and control to ensure quality, precision, and safety throughout the process.
- Running a Test Pass on Scrap Material: Before cutting your final workpiece, it’s highly recommended to run a test pass on a piece of scrap material. This trial run allows you to verify the accuracy of your toolpaths, check for potential collisions, and confirm that your cutting parameters are well-suited for the design and material. Using scrap material that’s similar in type and thickness to your actual stock gives you the most reliable preview.
- Start the Cut and Monitor Progress: Once your CNC router begins cutting, your job shifts to carefully observing the process. Keep an eye on the cutting bit to ensure it’s moving smoothly along the programmed path and not digging too deep or veering off-course. Also, be alert for signs of loose material, clamps shifting, or the dust collection system clogging. If you notice anything unusual, pause the machine immediately to investigate and make adjustments.
- Stay Nearby and Prepared: Never leave the CNC unattended during an active cut, especially with complex designs. If something goes wrong, you need to stop the machine immediately to avoid further damage. Keep a remote or emergency stop button accessible at all times.
- Adjust Cutting Parameters as Needed: If you notice burning, chatter, or excessive tear-out, consider adjusting the spindle speed or feed rate. For example, slowing down the feed rate can improve edge quality on delicate features, while increasing spindle speed may help when cutting dense hardwoods. If the bit seems overloaded or the cut is not reaching full depth, reduce the depth per pass or verify that your Z-zero point is accurate.
- Post-Cut Inspection: Once the job is complete, allow the spindle to stop fully before unclamping your material. Carefully remove the workpiece and inspect it for quality—checking for clean edges, correct depths, and complete cuts. If tabs were used, remove them gently and sand down any rough areas.
Executing the cut with attention and care ensures your design is translated from concept to reality with the highest possible precision. Staying alert, following safety practices, and inspecting the result thoroughly will help you avoid errors and produce a finished piece you can be proud of.
Tips for Success
Creating detailed patterns with a CNC router requires more than just technical know-how—it also depends on careful habits, smart planning, and attention to detail. Whether you’re a beginner or refining your craft, the following tips can help you avoid common mistakes and get the most out of your machine.
- Start Simple and Build Confidence: If you’re new to designing intricate patterns, begin with less complex shapes to practice tool control, machine setup, and material behavior. As your comfort level grows, gradually move to more detailed designs. This approach builds skill while minimizing risk.
- Use High-Quality Bits and Replace Them When Worn: The quality and condition of your cutting bits directly affect the precision and finish of your CNC work, especially when dealing with intricate patterns. Sharp bits produce cleaner edges, reduce the risk of tear-out, and require less force to cut through material, minimizing wear on your machine. Always inspect your bits before a job and replace them as soon as they show signs of wear.
- Simulate the Toolpath Before Cutting: Most CAM software includes simulation features that allow you to preview your toolpath in a virtual environment. This step helps you catch issues like tool collisions, inefficient paths, or uncut areas before wasting materials.
- Secure Materials Firmly: Ensure your workpiece is clamped tightly and evenly to the machine bed. Any shifting during the cut can ruin even the most carefully designed pattern. Consider using vacuum tables, double-sided tape, or jigs for added stability when working with smaller or delicate parts.
- Keep the Machine Clean and Maintained: Dust, debris, and resin buildup can interfere with mechanical parts, clog cooling systems, and reduce cutting accuracy over time. Make it a habit to clean the work area after each job—removing chips, vacuuming around the spindle, and wiping down rails and surfaces. A clean, well-maintained CNC router is more reliable, accurate, and safe to use.
By following these best practices, you’ll improve not only the quality of your CNC projects but also your confidence and efficiency as a maker. With patience and attention to detail, creating beautiful, intricate patterns will become a rewarding and repeatable process.
Summarize
Mastering the process of designing and cutting intricate patterns with a CNC router takes time, patience, and attention to detail. By understanding your machine’s capabilities, selecting the right tools and software, and following a thoughtful workflow—from design to execution—you can consistently achieve clean, detailed results. Whether you’re crafting artistic pieces or functional components, the key lies in careful planning, testing, and continuous improvement. With practice and patience, your CNC router can become a reliable tool for bringing complex, beautiful designs to life.
If you’re looking for a reliable CNC router to bring your intricate designs to life, AccTek CNC is a trusted manufacturer worth considering. As a professional CNC router supplier based in China, AccTek offers a wide range of high-precision machines that are ideal for cutting detailed patterns across wood, plastics, and other materials. With responsive technical support and customizable machine options, AccTek helps users turn complex digital designs into clean, precise results. Whether you’re creating decorative woodworking or high-detail prototypes, AccTek CNC provides the tools you need to succeed.